
The CGI proxy script requires a slightly different installation to the other scripts. Follow this guide if you are using a CGI proxy template. For all other scripts, just upload and you’re done!
� Download your chosen template (CGI proxy version)
� Make any necessary modifications to the site files (content, logo, META and advert code).
� Upload all the files to your server. Make sure that the nph-proxy-1.cgi file is uploaded in ASCII mode.
� CHMOD the nph-proxy-1.cgi file to 755.
That’s it! But I hear you asking what CHMOD to 755 means. Well, to keep it simple it’s all to do with the permissions of the file; who can write, read or execute any given file. For the CGI proxy script to work, we need to change the ‘standard’ permissions for one particular file; nph-proxy-1.cgi.
To do this select the file in your FTP server. Make sure that you have only selected nph-proxy-1.cgi, and not any of the other files as well. The exact process depends upon your FTP client, but most are very similar. There will either be an option called ‘CHMOD’, or ‘Change Permissions’. On most FTP clients this is accessed by right clicking on the selected file (nph-proxy-1.cgi), on others it may be on a menu under options. Select the option to CHMOD (or change permissions) and you’ll be presented with a box showing the file permissions (or attributes). It will be similar to this:
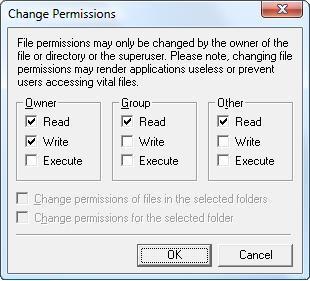
To CHMOD to 755 we change the permissions as follows:
� Owner: Select all three options (read, write & execute)
� Group: Select read & execute (leave write unchecked)
� Other: Select read & execute (leave write unchecked)
Your FTP file permissions window should then look something like this:

Save the changes and you’re done. Your CGI proxy should now work. If you have any problems then make sure that your server has full CGI access. CGI proxy is widely regarded as the most resource hungry proxy script. Many shared hosting accounts will not permit the use of any proxy scripts, so make sure you have suitable proxy hosting.